
How to Send a PDF Form to Be Signed in Adobe Sign
Published Date:
Description
Learn how to send a PDF form out to be signed by multiple people using Adobe Sign.
For more general information about using Adobe Sign, visit UVU’s eDocs webpage.
Solution
Log in to Adobe Sign
Using this link, log in to Adobe Sign.
Use your UVU email @uvu.edu to sign in. When you tab to or click on the password field, you should be redirected to UVU’s authentication page.
If the redirection fails, try clicking on the Adobe ID button under the following message: Already have an Adobe ID?.
If you are asked if this is a personal or company/school account as part of the authentication process, select Company or School Account and finish logging in.
Once logged in, verify that the UVU logo and POWERED BY Adobe Sign are in the top left of the screen.
If you do not see the UVU logo and POWERED BY Adobe Sign, please contact the Service Desk to help you get logged in to Adobe Sign.
Request Recipient Signatures
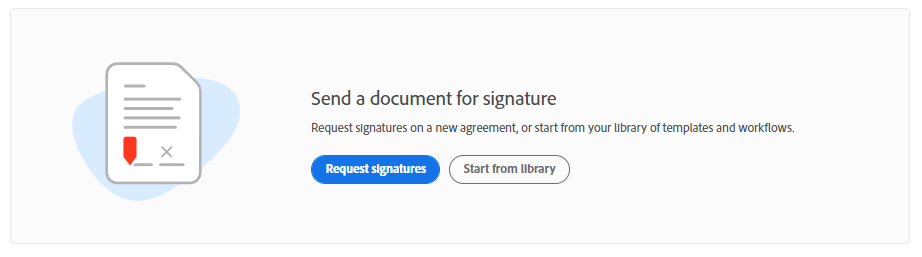
On the Adobe Sign home screen, click Request signatures. It is the blue button in the center of the home screen page.
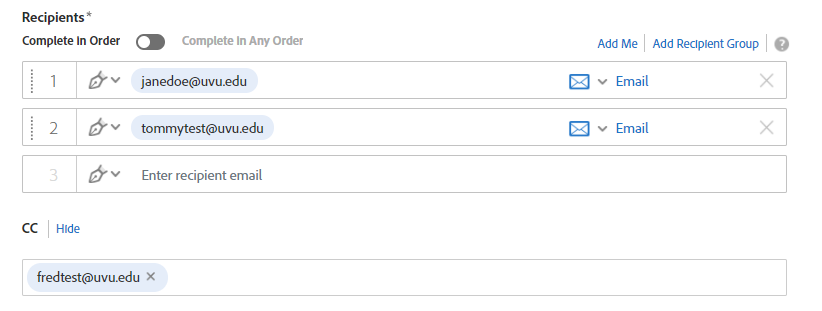
On the next page titled Get documents signed, enter the emails of all the recipients who need to interact with the form.
If you need a certain amount of signatures, you need to enter all the emails as a recipient.
You can change the type of recipient by selecting the drop-down next to the recipient email. It is recommended to only use signer, form filler, or approver for the recipients as needed.
If you need a person to receive a copy that is not a recipient, add their email in the CC section.
Add your PDF in the file section by dragging the PDF from your computer to the Files box in Adobe Sign.

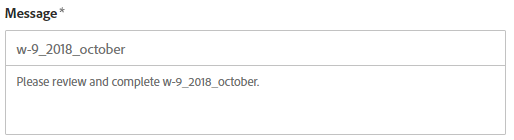
Under the Message section, customize the message to your recipients.
By default, the agreement name will be the name of the first file added. If you would like a better title than the form name, change it as needed.
If needed, edit the default message to create a more personalized message for your recipients.
The Options box on the right is optional, so you may use it as needed.
Click Preview & Add Signature Fields, then click the blue Next button.

Add Signing Fields to Your Form
To add the signing fields on the PDF form:
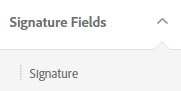
First, go to the top right and select the first recipient you want to sign.

Go to the signature part of the form for that recipient. Then, from the Signature Fields list on the right side, click on Signature or the desired option and drag it onto the form as needed.

Repeat for any other needed fields and recipients. For more information on adding fields, visit UVU’s eDocs webpage.
Send Out Your Form to Be Signed
Once you have all your form fields set and the PDF is ready to be signed, click the blue Send button. The form will be sent out to your recipients.

Related Articles
Contact Support
If you were unable to resolve your issue using the provided solution, please contact the Service Desk.