Uploading Student Lists to Inspire
Published Date:
Description
Inspire (a Civitas Learning application) allows all advisor-type users to load an external list of student IDs into a student group. Once a list is uploaded to a static group, users can add additional columns of data to see more information about individual students. With this uploaded list, users can access an individual student’s profiles or send communications to students through Inspire.
This upload feature accepts TXT, XLS, XLSX, CSV, and other tabular file formats. The file must contain student IDs only. To upload a list, a user must have advisor access to Inspire.
Solution
Create a Static Student Group Using an Imported Excel or Tabular List
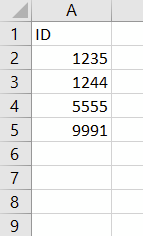
Save a list of UVIDs in a file on your computer or a network folder such as Box. This list should only contain students' UVIDs. The file format should be Excel (.xls or .xlsx extension), a comma-delimited format (.csv extension), or a text file (.txt). Other tabular file formats are acceptable.
Browse into Inspire. Select LOGIN WITH NETID on the Inspire homepage.

Login with your UVU credentials. On the homepage, select View Groups from the Quick Actions area.
On the Student Groups page, select Create Group at the top of the page.

From the Create Group page fill out or make the following options:
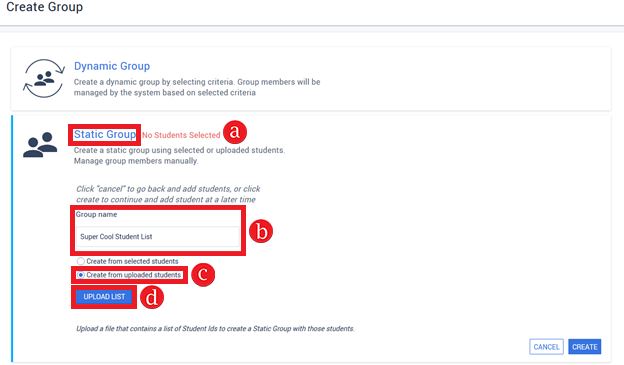
Select the Static Group option.
Type in a group name into the Group name text box.
Select the Create from uploaded students option.
Click the Upload List button. This will open the File Upload window.
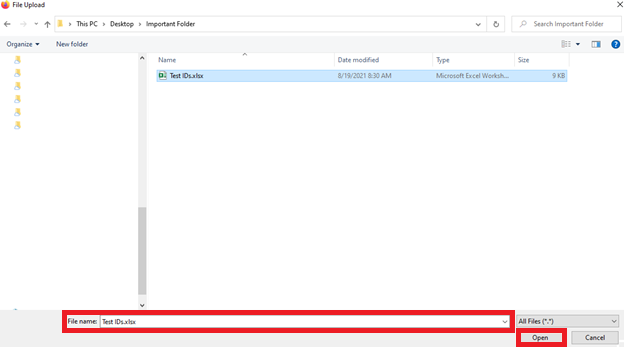
Through the File Upload window, navigate to where you saved the file created in step one. Select that file and select Open. This will load the file. Once Civitas has successfully loaded the file, a green checkmark icon along with the name of your file will appear below the Upload List button.
Select Create. This will take you back to the Student Groups homepage to wait while Civitas builds this new group.

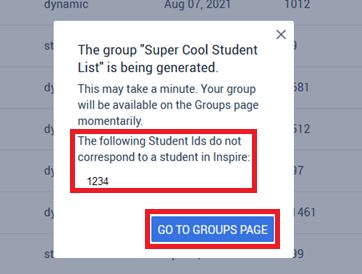
While the group is being built, a message will appear to inform you the group is being built. It will also list all IDs in your file that could not be matched to an existing student profile. (See below for more information on why an ID may not be loaded into Inspire.) Select Go To Groups Page.
Once your group has been created, it will appear on your list of custom groups. It may take a few minutes for this to complete, depending on the number of IDs uploaded. The number of unique student IDs uploaded will be reflected in the Number of Members column. Select the group name to open the group and view the students in the group.

Why Did a Student Not Upload to Inspire?
To upload a student to a group, the UVID must match an existing student profile in Inspire. Inspire creates profiles for a limited number of UVU students based on the criteria below:
The student is registered for at least one class at UVU in the current or future term.
The student is not registered for any current or future classes but is admitted to UVU for a future term.
The student is not registered for any current or future classes but was registered in at least one UVU class in the past three years.
If you are confident the student meets any of the above criteria and therefore should have been uploaded to the group, then please submit a service ticket for resolution. Include the UVID(s) in the ticket.
Related Articles
- How Do I Create a Dynamic Group in Inspire
- How to Use Engagement Opportunity for Students With More Than a 5% Drop in Persistence Prediction in Last 7 Days
- Uploading Student Lists to Inspire
- What is Civitas and How Do I Get Access?
- How to Create an Athletics/Team Report in Inspire
- How Can I Remove a Student from an Engagement Opportunity Once the Opportunity Has Been Addressed?
Contact Support
For any issues or questions regarding Civitas or Inspire please submit a request to the Academic IT and Analytics Team through the UVU Service Center Portal.
If you are experiencing any other issues, please contact the Service Desk.
